Kerio Connect can be easily and quickly configured to use a high deliverability, anti-abuse relay service such as the MailChannels Outbound Filtering platform.
Step 1: Ensure SMTP is installed on your host
This guide depends upon the underlying SMTP service being available on your local Kerio Connect System.
- Consult your Kerio Connect system documentation and if not already present, install and configure SMTP according to the software developers recommendations. http://www.kerio.com/connect/manual
Step 2: Setup an Authenticated Smarthost Relay
Authentication is required and the SMTP credentials used in this guide are place holders only. These values must be altered to use your own SMTP credentials on an active MailChannels Outbound Filtering account.
If you have reached this setup page and do not yet have valid SMTP credentials, please sign up or contact our Support Team if you need us to recover your existing account information.
- Login to the Kerio Administration interface.
- Select Configuration > SMTP to open the main configuration screen.
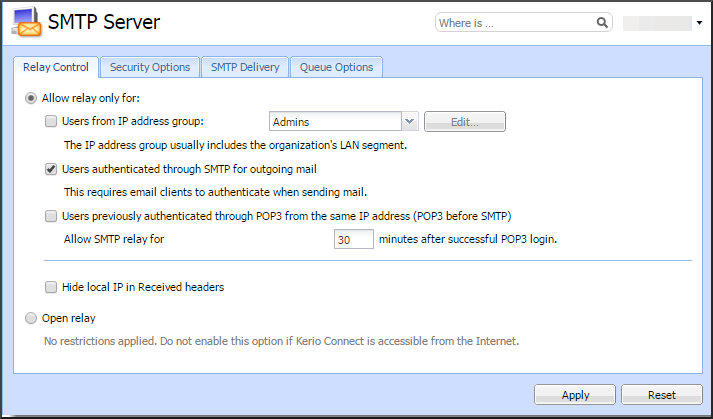
- Select the Relay Control tab and if not set, check the "Allow relay only for:" radial and under this selection, check the box for "Users authenticated through SMTP for outgoing mail".

- Next, select the SMTP Delivery tab.
SMTP client options
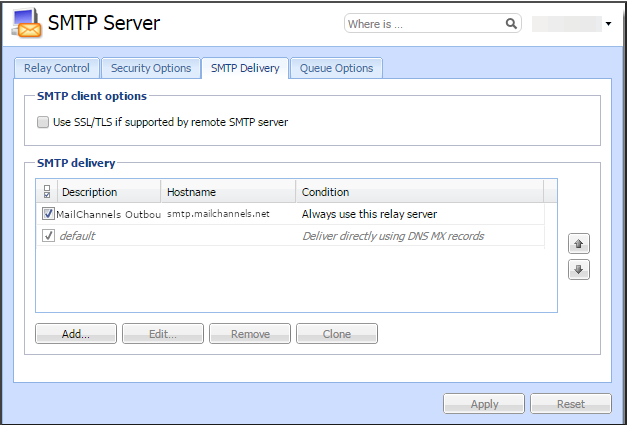
If checked, uncheck the "Use SSL/TLS if supported by remote SMTP server" option.
This allows your client to use full TLS if desired but does not encrypt everything relayed by default. MailChannels settings include opportunistic TLS outbound which does this exact thing, only after our content scanners confirm and reject spam.
SMTP delivery
This section lists all of your defined SMTP relays and allows you to add new or modify existing configurations. Kerio Connect processes your relays items and rules in the order in which they are listed.
It is important that you do not remove the default profile from the SMTP delivery list. Move it to the last position after adding any new SMTP relay items and use it as your last resort destination instead. - Click on the Add button to setup an SMTP relay item.

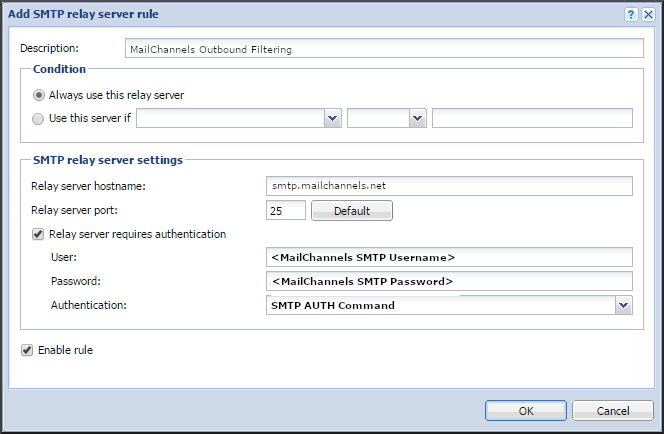
Description: MailChannels Outbound Filtering
Condition: "Always use this relay server"
Relay server hostname: smtp.mailchannels.net
Relay server port: 25 (If you are unable to use port 25, we also support 2525, 465 and 587)
Relay server requires authentication: Checked
User: Replace <text> with your MailChannels SMTP username
Password: Replace <text> with your MailChannels SMTP password created in your outbound console > settings > account > SMTP Passwords > Create
Authentication: SMTP AUTH Command
Enable rule: Checked - Click the OK button to save your settings and create your MailChannels Outbound Filtering SMTP relay. Click to highlight your new SMTP relay item and using the arrows to the right, move it to the top of the list to ensure your global MailChannels Outbound Filtering rule is evaluated before your default settings. See the SMTP delivery tab image above.
Fixing Common Issues
Step 1: Alternate SMTP Ports
MailChannels supports connections to alternative SMTP ports for Outbound Filtering. Smarthost relays can be configured to use ports 2525, 465 or 587 should 25 be inaccessible to you for any reason.
Step 2: Exclude Domain or Sender from SMTP relay
When excluding a Domain or Sender from an SMTP relay, ensure that the new SMTP relay item is listed above any other SMTP relay item which uses "Always use this relay server". Kerio Connect tests your rules in the order in which they are listed and does not continue processing after a match is found.
Comments
Article is closed for comments.